MUSHing 101
How do I shot MUSH?
MUSH is an acronym for Multi-User Shared Hallucination. It is based out of ancient MUD (Multi-User Dungeon) technology which forms the ancient origins of MMORPGs. Everquest and other early derivatives were basically a graphical skin over a MUD, for example.
This is relevant because this shapes the kind of experiences and expectations you will have on a MUSH. a MUSH is a text-based roleplaying environment. The only graphics that exist are ANSI-based character graphics. You might be familiar with this style if you've played old roguelikes or Dwarf Fortress.
To connect to the MUSH server and start making a character, you will need a MU* client. There are several options:
- MUSHClient (Windows)
- Potato (Windows/Mac/Linux)
- BeipMU (Windows/Mac)
- TinyFugue (Windows/Mac/Linux, requires compiling)
- Mukluk (Android)
Download and install one of these clients, and configure a connection to the MUSH server.
- Address: convergence.mushhaven.com
- Port: 10000
Connecting And Account Creation
After you download a MUSH client and configure the connection, you will find yourself staring at the connect screen.
This MUSH uses a MMO-style account system that your characters will be associated with. When you use 'register', you will be creating the account through which you will be accessing your characters with, not your character itself, please keep that in mind. The character creation comes after you have logged in.
Creating a character is a slightly more involved process. It is done entirely through the MUSH but it will save your progress, you can go as fast or slow as you please. For details on how that works, check out [[Creating A Character]]. We will be assuming you have gone through that file for the rest of this document.
Once you have created the character object and selected to play it, you will be moved to the Welcome Room.
The Room
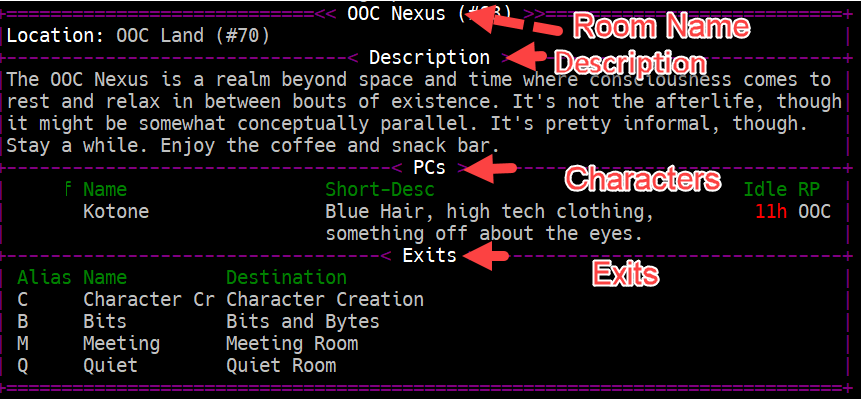
A labeled example of what a room typically looks like on a MUSH.
Rooms are virtual spaces that you move between in order to navigate the MUSH. A room is generally separated into 4 notable sections:
- Name - The name of the room. Straightforward.
- Description - The idea of what the general environment is in the room.
- Players - Generally holds a list of players and basic information about them. You'll get more information on how to get additional info shortly.
- Exits - A list of visible exits that includes the thing you need to type to use that exit. Typically you will see a direction listed such as 'N', 'E', 'W', 'S', 'U', or 'D' but other options apply. This works kind of like those old text adventure games where you enter a direction to move. Keep that in mind, we'll be revisiting that later.
Useful Commands
There are a number of commands that are generally used to interact with the MUSH. By general tradition, most MUSHes have a set of hardcoded commands that are part of the basic package. Anything that is custom coded for the MUSH or added to it has a + or similar prepended symbol. Commands with @ tend to be system level commands that are mostly low level utility.
- help - Shows you general information about the built-in MUSH functions. This can get complicated. You can type help <subject> to get more information on a specific subject.
- +help - Shows a list of the commands and systems that have been added to the MUSH. You can type +help <subject> to get more information on a specific subject. Many of the commands listed here have more complex uses that you can discover using +help <command>.
- +who - Shows you a list of who is on the MUSH.
- +finger <character> - An old UNIX tradition. +finger will display a general profile of any character name you enter, or if you leave it blank, will display your own.
- look <target> - If the target is blank, will show you the room information again just like when you entered the room. Otherwise, will give you the description of whatever you entered, be it a character or object.
- say <text> - Has your character say the given text. Example: say Foo will create a line in the room that says: Character says, "Foo". This can be abbreviated with ", so "Foo is the same as the previous command. See help say for more details.
- pose <text> - Has your character do the given text. for example, pose waves! would create a line in the room that says Character waves!. This can be abbreviated with :, so :waves! would have the same result as the previous command. See help pose for more details.
- @emit <text> Sends the text given to everyone in the room without prepending your name. Useful in a lot of situations. The shortcut for this is \. See help @emit for more information.
- page <person>=<text> Sends a message to one or more players. Useful for coordination and other needs. Can be abbreviated with p <player>=<text>. Check out help page for more details.
- +ooc <text> - Sends a message to the room tagged as OOC. Useful for OOC coordination. text accepts shortcuts for : and ; in case you want to do those OOCly.
- +wizlist When all else fails, this shows the list of admin and their status. When contacting an admin, generally try to make sure you check with the one that's most relevant to the subject first (Plotstaff for help with a plot, appstaff for feedback/checking in on an app, etc). If all else fails, the buck stops with the Director.
Channel Communication
MUSHes have a 'channel' system that allows people to communicate across rooms. The following commands will be useful in that respect:
- @chan/list - Displays the list of available channels.
- @chan/on <channel> - Turns on a channel for communication.
- +<channel name> <text> - Transmits the given text over the channel. You can use the : and ; shortcuts over channels as well.
For example: +guest Hello! will display the following to anyone on the Guest channel:
<Guest> Character says, "Hello!"
Scene Commands
- +scene/create <title>[=<pitch>] - All scenes must have a unique title (case insensitive.) They may optionally have a pitch, the broad strokes gist of what the scene's meant to be about.
- +scene/start <id> - Start a scene. It will bind the current room to it. Only one scene can be in a room at a time.
- +scene/pause <id> - Pause an ongoing scene. It will stop recording poses.
- +scene/finish <id> - Mark a scene as finished. Don't forget to set an outcome!
For additional information about manipulating scenes as well as scheduling, see +help +scene.